
© All Rights Reserved | Roof Replacement and Repair - Zaman Roofing LLC. | Website Design & CT SEO Powered by High Point SEO CT
- Google Rating5.0Based on 33 reviews
 Zaman Roofing - CT Roofing Contractors & Roof Repair5.0Sergey Y."Zaman Roofing” recently completed a roof replacement project in our condo complex, and we are extremely satisfied with their service. From start to finish, their team demonstrated professionalism, efficiency, and exceptional craftsmanship. They were prompt in their communication, providing detailed explanations and answering all our questions. The crew arrived on time, worked diligently, and completed the project within the estimated timeframe.Not only did Zaman Roofing exhibit outstanding technical skills, but they also ensured minimal disruption to our daily activities. They took great care to protect our property, cleaning up thoroughly each day and leaving no trace of debris behind.The quality of the new roof is outstanding. Zaman Roofing used top-grade materials and paid attention to every detail, resulting in a sturdy and visually appealing finished product. The roof has significantly enhanced the overall appearance of our condo complex.We would highly recommend Zaman Roofing to anyone in need of roofing services. Their professionalism, expertise, and attention to customer satisfaction make them a reliable choice for roof replacements. We are grateful for their excellent work and would not hesitate to hire them again in the future.Christopher Z.Zaman Roofing was AWESOME!!!! This is my third time doing a roof in CT on my third home and Zaman did an outstanding job on my rather unique roof line. They even replaced a skylight. I needed a Roof Contract in place before insurance would allow the purchase because the seller was a DeeBag. Zaman worked with my realtor, banker, etc and even waited patiently while the seller delayed the process by 4 months. The week I closed, Zaman Roofing was up and at em. Stripping, prepping and replacing. In and Out. Property was nice and clean after the work was complete. I would highly recommend.Steve TZaman Roofing, located in Berlin, CT, truly excels in providing top-notch roofing services. I am absolutely thrilled to give them a well-deserved 5-star review for their outstanding work. They have proven themselves as experts in roofing Berlin CT, and I couldn't be happier with the results.When it comes to roofing in Berlin, Zaman Roofing stands out from the competition. Their team of skilled professionals demonstrated exceptional attention to detail during the installation of my new roof. They meticulously handled every aspect of the project, ensuring both aesthetics and durability were top-notch.What impressed me the most was Zaman Roofing's commitment to customer satisfaction. From my initial contact with them, they were responsive, courteous, and eager to understand my specific roofing needs in Berlin. Their exceptional customer service throughout the entire process made me feel valued as a client.Zaman Roofing's expertise in roofing Berlin is truly commendable. They have an extensive portfolio of successful projects throughout Berlin, CT, showcasing their skill and knowledge in a variety of roofing styles and materials. Regardless of the complexity of the job, they have the necessary resources to deliver exceptional results.I cannot emphasize enough how satisfied I am with Zaman Roofing's services in Berlin, CT. Their professionalism, reliability, and dedication to their craft are unparalleled. If you're searching for exceptional roofing services in Berlin CT, Zaman Roofing is the company to choose. They will exceed your expectations in every way.In conclusion, Zaman Roofing unquestionably deserves a stellar 5-star rating for their exemplary roofing services in Berlin, CT. Their expertise in roofing Berlin and roofing Berlin CT shines through in their exceptional workmanship and customer service. I highly recommend Zaman Roofing for all your roofing needs.Gary G.Zaman replaced the roof on my 2,200 sq. ft. colonial in 2015. The workmanship was perfect. Unfortunately, over time, the top-of-the line shingles discolored. He was totally supportive in getting the manufacturer to replace them at no cost to me. He just replaced the roof with the new shingles. It was another perfect job. It was completed in one day. The crew was great and they cleaned the area spotless.Chris DWe used Zaman Roofing for our Roof and Gutter Replacement, I acquired 5 quotes for the work and found Zaman to be the most reasonable, it was a Good Decision to choose Zaman Roofing, Seweryn was Professional in every aspect and the Clean-up was nothing short of Amazing, I would Highly Recommend using Zaman RoofingRobert D.Excellent Service and Value - great crew and easy to deal with - highly recommended !Sunghoon P.Great work and reasonable price. I am so happy with their service. I asked a bunch of questions before and after the service and his responses were very prompt and straight to the point. Highly recommend.Adrienne M.I am so pleased that I used this company. My new roof looks fantastic. Such a hard working crew. Seweryn was informative and professional. Price was very completive. Don't hesitate to use them you will be very satisfied. Highly recommend!Nancy M.Good communication, timely response and knowledgeable. Very happy with our experience and highly recommend this company.Beata M.We used Zaman for our roof replacement recently and are very pleased. They replaced our roof in one day and gave us a very competitive quote. Good quality of work. Highly recommended.Lori K.They were here when they said they would. Professional & left everything neat ,cleaned up everything. They were in & out in a day & a half. Would recommend Zaman roifing.Dan R.A+ service, professional and quick response time.Anna G.Zaman and his crew provide great workmanship they installed new roofs they take great pride in the work they do. They were punctual and did a amazing job with the roof installation and clean up. Highly recommend Zaman Roofing to family and friends. Thank you for the opportunity to work with such a amazing contractorScott M.Awesome contractor, I would highly recommend him to family & friends. Seweryn & his crew were here on time & worked diligently. They were the happiest workers I've ever dealt with (I am a former construction project manager with the Federal government). Any & all questions were answered. My neighbors couldn't believe they finished the job in one day & complimented how great the new roof looks.Clement D.Great roofing contractors. I love to recommend it to my friends and family.Karen 9.With the quality, price, timeliness, all round nice guy and great crew, Zaman Roofing LLC is what other companies aspire to be.... Clean, helpful and a pleasure to recommend....james C.Excellent experience from start to finish, all appointments and work times met in a timely fashion, workmanship and clean up left nothing to be desired.Would be a definite recommendation, very pleased.Margaret B.I had obtained multiple quotes and did my due diligence research and Seweryn Zaman came back with fair price and good recommendations. He was professional, explained everything that he was going to do and never once he rushed me during decision process. He showed up on time with his hard working crew and finished my roof in one day. I was amazed with his crew who worked like busy bees. Very impressed with the clean up process and the end product. Two months after he finished my roof he was still helping me deal with the insurance company making sure I had everything I needed. Thank you SewerynSteve B.Very professional and easy to work. The crew came in, replaced my roof and then cleaned up everything! Highly recommended.Jim O.Competitive quote among four others. Seweryn Zaman provided larger color samples of the shingle colors we were interested in. He obtained the building permit, showed up on the day expected with his entire crew. Our older roof was on 24" trusses and needed more plywood replaced than anticipated. He got the additional sheets replaced on the day of the re-roofing. The crew worked with him late until the job was done and picked up every piece of old debris. The roof passed final town inspection with no concerns. Zaman Roofing is easy to deal with; he's responsive on text messages and phone calls. I used them in the past for an emergency repair and he found a well-hidden leak from the builder.Dale C.The crews did a good job, and the leader of the crew did a great job when they replaced the roof of my house in Farming on 7/6&7 this year. When they worked on the project, they worked professionally and in detail. We are very pleased with the work they have done, and highly recommend people to have the company worked on their roof projects.Forrest B.Zaman's was very professional, excellent quality of work and very responsive to our needs. This roofing experience was excellent from start to finish and provided an excellent value. Would certainly recommend them to any friend.Yonatan M.We used Zaman Roofing to replace our roof in 2019 and could not be happier with the service and product. A highly professional company and great personal interaction with the owner. The workers took great care of our landscaping, and the owner was there frequently to supervise the work and take care of finishing touches like flashing the chimney. We have had zero issues since then and highly recommend this company.Quinn V.Zaman was awesome. He was communicative, on-time, and was able to give me a quick inspection of our roof despite the rain. I rarely have a contractor tell me that I didn't need to spend any money, but Zaman told me my roof was fine for the next several years.magdalena K.We recently used Zaman Roofing to replace our 26-year-old roof. Right from the start they were great! Sevy was extremely professional and knowledgeable and gave us a great quote. Everything was done as they described and the final project looked great. The owner was on the job from start to finish as he promised.Ariadna G.Our experience with Zaman Roofing was excellent. I was very impressed with both their work and their customer service. Seweryn was very knowledgeable and professional.Larry G.What a wonderful business. Very responsive. They showed up exactly when expected, completed the project quickly and accurately and left no trace after clean up. All with a very competitive price. I would highly recommend Zaman to anyone looking to have roofing work done.STEVE R.I was very pleased with the roof and gutter repairs performed by Zaman Roofing on two of my buildings. Good workmanship and fair prices, I would recommend and use again.Danielle D.These guys stripped and reshuffled my roof is 1 day! They did an awesome job. Roof is beautiful. He uses a dump trailer which is great and they cleaned up well. Very happy with the work. Also pricing was fair.

How to Put a Tarp on a Roof
Category: Roofing • October 10, 2025
A tarp can be used temporarily to cover the roof of your house until you can afford to repair it, during times when it becomes damaged in a storm or it begins to leak. Knowing how to cover a roof with a tarp will prevent water from entering your house, and then growing mold, and or weakening your house leading to structural problems.
In this guide, we will take you through all you need to know like that of selecting the appropriate tarp and installing it securely. Whether it’s due to hurricane destruction in Florida or a storm in the midwest, this manual is customized to homeowners wanting a quick, do-it-yourself solution.
Why Use a Tarp on a Roof?
A roof tarp is a temporary cover that you place on damaged or leaking sections of your roof, in order to protect your home against rain, wind, and debris.
Tarps can come in handy after:
- Heavy storms or hurricanes
- Damage caused by fallen branches of trees or hail
- Claims are filed, waiting insurance inspection
By wrapping up the area that is affected, you minimize the chances of having to pay a lot of money for interior repair.
What You’ll Need
The right materials and safety gear are required before climbing up to your roof.
Tools and Supplies
- Waterproof, heavy-duty (at least 20 mil thick)
- Roofing nails or screws
- 2×4 wooden boards
- Hammer or cordless drill
- Utility knife or scissors
- Ladder (sturdy and preferably extendable)
- Measuring tape
- Safety harness (should be used on steep roofs)
- Working gloves and non-slip shoes
Step 1: Assess the Damage
The roof should be inspected to identify the damaged part before placing the tarp. Search for missing shingles, punctures, or soft spots. It is better to inspect while on the ground with the assistance of binoculars or a drone, when possible.
Safety Tip: Do not use the roof in the middle of rain, high winds, or lightning. Hire a professional if the roof is too steep or you are uncertain about it.
Step 2: Measure the Area
After you have determined the place to be covered:
- Measure the length and the width of the damaged part with measuring tape.
- Add an addition of 3 to 4 feet of the total length
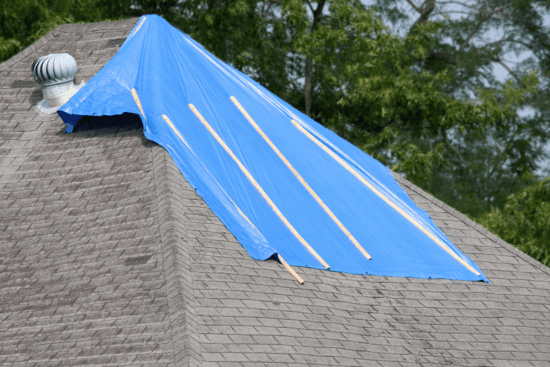
Select a tarp that will cover the ridge (top peak) as much as possible. This will ensure that there is no seepage of water underneath the tarp.
Step 3: Prepare the Tarp and Boards
- Put the tarp on the ground, and cut it to size, as necessary
- Put 2 x 4 boards along the edges of the tarp (particularly on the top and bottom sides)
- Roll the ends of the tarp around the boards once or twice. This makes it heavier and it will enable you to fix the tarp without necessarily nailing it on the roof.
Safety Tip: Drill holes in the boards ahead of time to make the boards easier to install and to prevent splitting.
Step 4: Secure the Tarp to the Roof
Carefully climb the ladder with the assistance of another person to stabilize the ladder.
Option 1: Boarding with Nails
- Lay the tarp on the affected part ensuring that it covers the ridge where necessary
- Attach the wrapped boards in the roof decking or rafters, not only to the shingles; also secure them in place in case of wind.
- Beginning at the top, pull the tarp downwards, ensuring that it is not loose.
- Strap more 2 x 4s onto the sides to discourage flapping.
Option 2: Non-Invasive interventions with Sandbags or Weights
When you are not going to nail into the roof:
- Cover the damaged places with the tarp
- Use sandbags or heavy brick roof tarp anchors to anchor it
- Ensure that water can still run out of the roof; do not block gutters
Important: This technique is not as safe when there is a wind.
Step 5: Double-Check for Gaps and Water Flow
- Make sure that the tarp is a tight and smooth piece with no significant folds or air bubbles
- The lower portion of the tarp is not to be bent over the roof
- The tarp should allow the water to seep in gutters or away your foundation
Step 6: Monitor and Replace as Needed
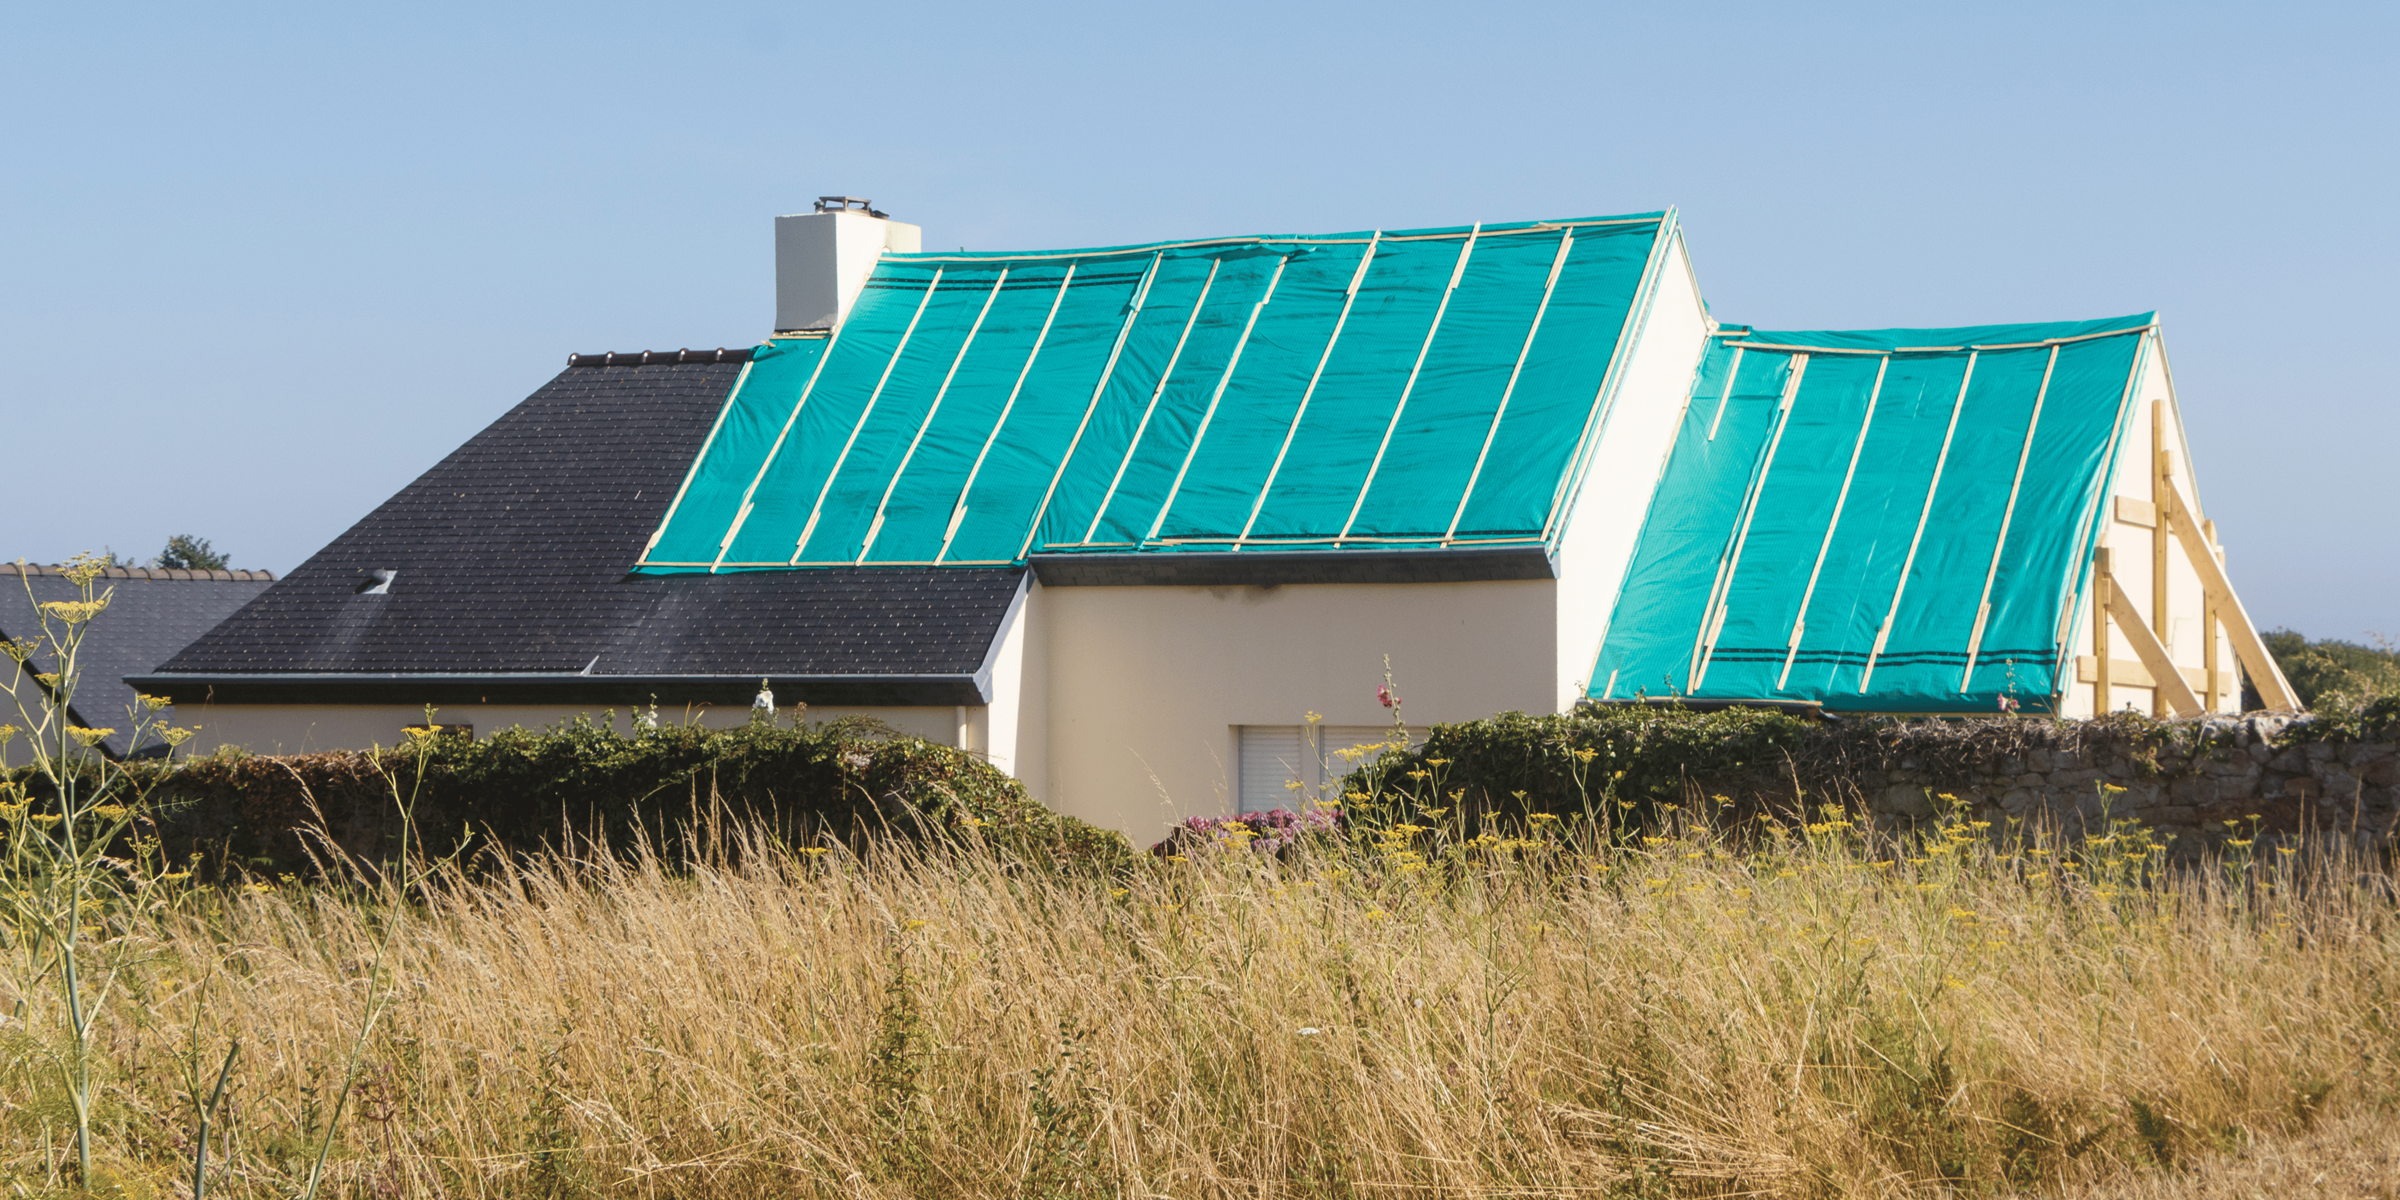
- Tarps are not supposed to be permanent. Your tarp can last only a few days or several months, which is based on the quality of the material and the weather
- Inspect tarp following each of the major storms
- Check for evidence of wear such as loose boards or standing water
- Get another one immediately when it begins to move or wear out
Additional Tips for Success
Choose the Right Tarp
- A UV resistant tarp should be used when keeping it longer than a week
- Blue tarps are usual but the heavy-duty tarps that are made of silver or black provide more durability and protection against the sun
Use a Buddy System
Don’t work alone; it is necessary to have someone to hold the ladder, deliver the tools, or help in case of an emergency.
Contact Insurance
If the damage on your roof is storm-related, make pre- and post-tarping photos. Insurance companies will reimburse you most of the time on temporary actions taken to avoid further damage.
When to Call a Professional
Although it is possible to do it on your own with DIY tarping, it is necessary to hire a roofing expert if:
- The damage is either large-scale or structural
- It is too steep a roof to climb on
- You cannot be sure how to get the tarp tied
- You desire a more permanent alternative temporary solution
Most roofers will provide emergency tarping; they are able to install it in a more secure way without causing harm to your home.
