
© All Rights Reserved | Roof Replacement and Repair - Zaman Roofing LLC. | Website Design & CT SEO Powered by High Point SEO CT
- Google Rating5.0Based on 33 reviews
 Zaman Roofing - CT Roofing Contractors & Roof Repair5.0Sergey Y."Zaman Roofing” recently completed a roof replacement project in our condo complex, and we are extremely satisfied with their service. From start to finish, their team demonstrated professionalism, efficiency, and exceptional craftsmanship. They were prompt in their communication, providing detailed explanations and answering all our questions. The crew arrived on time, worked diligently, and completed the project within the estimated timeframe.Not only did Zaman Roofing exhibit outstanding technical skills, but they also ensured minimal disruption to our daily activities. They took great care to protect our property, cleaning up thoroughly each day and leaving no trace of debris behind.The quality of the new roof is outstanding. Zaman Roofing used top-grade materials and paid attention to every detail, resulting in a sturdy and visually appealing finished product. The roof has significantly enhanced the overall appearance of our condo complex.We would highly recommend Zaman Roofing to anyone in need of roofing services. Their professionalism, expertise, and attention to customer satisfaction make them a reliable choice for roof replacements. We are grateful for their excellent work and would not hesitate to hire them again in the future.Christopher Z.Zaman Roofing was AWESOME!!!! This is my third time doing a roof in CT on my third home and Zaman did an outstanding job on my rather unique roof line. They even replaced a skylight. I needed a Roof Contract in place before insurance would allow the purchase because the seller was a DeeBag. Zaman worked with my realtor, banker, etc and even waited patiently while the seller delayed the process by 4 months. The week I closed, Zaman Roofing was up and at em. Stripping, prepping and replacing. In and Out. Property was nice and clean after the work was complete. I would highly recommend.Steve TZaman Roofing, located in Berlin, CT, truly excels in providing top-notch roofing services. I am absolutely thrilled to give them a well-deserved 5-star review for their outstanding work. They have proven themselves as experts in roofing Berlin CT, and I couldn't be happier with the results.When it comes to roofing in Berlin, Zaman Roofing stands out from the competition. Their team of skilled professionals demonstrated exceptional attention to detail during the installation of my new roof. They meticulously handled every aspect of the project, ensuring both aesthetics and durability were top-notch.What impressed me the most was Zaman Roofing's commitment to customer satisfaction. From my initial contact with them, they were responsive, courteous, and eager to understand my specific roofing needs in Berlin. Their exceptional customer service throughout the entire process made me feel valued as a client.Zaman Roofing's expertise in roofing Berlin is truly commendable. They have an extensive portfolio of successful projects throughout Berlin, CT, showcasing their skill and knowledge in a variety of roofing styles and materials. Regardless of the complexity of the job, they have the necessary resources to deliver exceptional results.I cannot emphasize enough how satisfied I am with Zaman Roofing's services in Berlin, CT. Their professionalism, reliability, and dedication to their craft are unparalleled. If you're searching for exceptional roofing services in Berlin CT, Zaman Roofing is the company to choose. They will exceed your expectations in every way.In conclusion, Zaman Roofing unquestionably deserves a stellar 5-star rating for their exemplary roofing services in Berlin, CT. Their expertise in roofing Berlin and roofing Berlin CT shines through in their exceptional workmanship and customer service. I highly recommend Zaman Roofing for all your roofing needs.Gary G.Zaman replaced the roof on my 2,200 sq. ft. colonial in 2015. The workmanship was perfect. Unfortunately, over time, the top-of-the line shingles discolored. He was totally supportive in getting the manufacturer to replace them at no cost to me. He just replaced the roof with the new shingles. It was another perfect job. It was completed in one day. The crew was great and they cleaned the area spotless.Chris DWe used Zaman Roofing for our Roof and Gutter Replacement, I acquired 5 quotes for the work and found Zaman to be the most reasonable, it was a Good Decision to choose Zaman Roofing, Seweryn was Professional in every aspect and the Clean-up was nothing short of Amazing, I would Highly Recommend using Zaman RoofingRobert D.Excellent Service and Value - great crew and easy to deal with - highly recommended !Sunghoon P.Great work and reasonable price. I am so happy with their service. I asked a bunch of questions before and after the service and his responses were very prompt and straight to the point. Highly recommend.Adrienne M.I am so pleased that I used this company. My new roof looks fantastic. Such a hard working crew. Seweryn was informative and professional. Price was very completive. Don't hesitate to use them you will be very satisfied. Highly recommend!Nancy M.Good communication, timely response and knowledgeable. Very happy with our experience and highly recommend this company.Beata M.We used Zaman for our roof replacement recently and are very pleased. They replaced our roof in one day and gave us a very competitive quote. Good quality of work. Highly recommended.Lori K.They were here when they said they would. Professional & left everything neat ,cleaned up everything. They were in & out in a day & a half. Would recommend Zaman roifing.Dan R.A+ service, professional and quick response time.Anna G.Zaman and his crew provide great workmanship they installed new roofs they take great pride in the work they do. They were punctual and did a amazing job with the roof installation and clean up. Highly recommend Zaman Roofing to family and friends. Thank you for the opportunity to work with such a amazing contractorScott M.Awesome contractor, I would highly recommend him to family & friends. Seweryn & his crew were here on time & worked diligently. They were the happiest workers I've ever dealt with (I am a former construction project manager with the Federal government). Any & all questions were answered. My neighbors couldn't believe they finished the job in one day & complimented how great the new roof looks.Clement D.Great roofing contractors. I love to recommend it to my friends and family.Karen 9.With the quality, price, timeliness, all round nice guy and great crew, Zaman Roofing LLC is what other companies aspire to be.... Clean, helpful and a pleasure to recommend....james C.Excellent experience from start to finish, all appointments and work times met in a timely fashion, workmanship and clean up left nothing to be desired.Would be a definite recommendation, very pleased.Margaret B.I had obtained multiple quotes and did my due diligence research and Seweryn Zaman came back with fair price and good recommendations. He was professional, explained everything that he was going to do and never once he rushed me during decision process. He showed up on time with his hard working crew and finished my roof in one day. I was amazed with his crew who worked like busy bees. Very impressed with the clean up process and the end product. Two months after he finished my roof he was still helping me deal with the insurance company making sure I had everything I needed. Thank you SewerynSteve B.Very professional and easy to work. The crew came in, replaced my roof and then cleaned up everything! Highly recommended.Jim O.Competitive quote among four others. Seweryn Zaman provided larger color samples of the shingle colors we were interested in. He obtained the building permit, showed up on the day expected with his entire crew. Our older roof was on 24" trusses and needed more plywood replaced than anticipated. He got the additional sheets replaced on the day of the re-roofing. The crew worked with him late until the job was done and picked up every piece of old debris. The roof passed final town inspection with no concerns. Zaman Roofing is easy to deal with; he's responsive on text messages and phone calls. I used them in the past for an emergency repair and he found a well-hidden leak from the builder.Dale C.The crews did a good job, and the leader of the crew did a great job when they replaced the roof of my house in Farming on 7/6&7 this year. When they worked on the project, they worked professionally and in detail. We are very pleased with the work they have done, and highly recommend people to have the company worked on their roof projects.Forrest B.Zaman's was very professional, excellent quality of work and very responsive to our needs. This roofing experience was excellent from start to finish and provided an excellent value. Would certainly recommend them to any friend.Yonatan M.We used Zaman Roofing to replace our roof in 2019 and could not be happier with the service and product. A highly professional company and great personal interaction with the owner. The workers took great care of our landscaping, and the owner was there frequently to supervise the work and take care of finishing touches like flashing the chimney. We have had zero issues since then and highly recommend this company.Quinn V.Zaman was awesome. He was communicative, on-time, and was able to give me a quick inspection of our roof despite the rain. I rarely have a contractor tell me that I didn't need to spend any money, but Zaman told me my roof was fine for the next several years.magdalena K.We recently used Zaman Roofing to replace our 26-year-old roof. Right from the start they were great! Sevy was extremely professional and knowledgeable and gave us a great quote. Everything was done as they described and the final project looked great. The owner was on the job from start to finish as he promised.Ariadna G.Our experience with Zaman Roofing was excellent. I was very impressed with both their work and their customer service. Seweryn was very knowledgeable and professional.Larry G.What a wonderful business. Very responsive. They showed up exactly when expected, completed the project quickly and accurately and left no trace after clean up. All with a very competitive price. I would highly recommend Zaman to anyone looking to have roofing work done.STEVE R.I was very pleased with the roof and gutter repairs performed by Zaman Roofing on two of my buildings. Good workmanship and fair prices, I would recommend and use again.Danielle D.These guys stripped and reshuffled my roof is 1 day! They did an awesome job. Roof is beautiful. He uses a dump trailer which is great and they cleaned up well. Very happy with the work. Also pricing was fair.

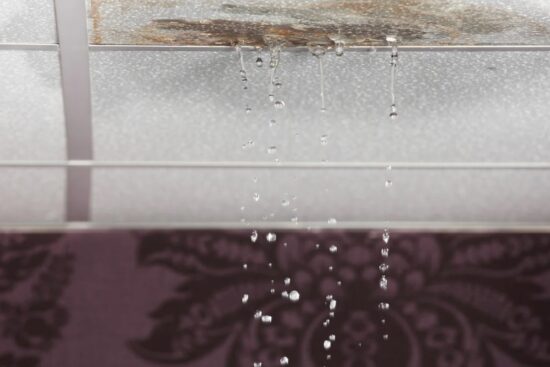
How to Repair a Leaking Roof From the Inside
Category: Roof Repairs • February 15, 2025
Dealing with a leaking roof can be a challenging experience, particularly when the interior space has already suffered damage. Nonetheless, you can provide a short-term fix and halt the issue of water leakage until you can address the roof repair from the outside. If you’re dealing with a leaking roof, the following information will help you tackle the issue from the inside effectively.

Assess the Damage
Before starting any repair work, it’s important to determine what needs to be fixed:
Identify the Leak Source
Inspect for Condensation: Take a moment to examine the ceiling and walls for any stains or discoloration that could indicate condensation buildup on the surfaces. The origin of the leak is clearly indicated by the stain, as water from the roof would trickle down, creating a noticeable mark.
Mold and Mildew: Mold and mildew can become a significant issue, especially when stagnant water is present. Mold and mildew not only create an unpleasant environment but also pose health risks to those living in the home. It’s important to inspect the areas around the leak for any signs of mold, as this can be resolved during the repair process.
Flashlight and Mirror: For those tiny holes, using a flashlight along with a small mirror can be essential for locating leaks. One method is to angle the flashlight in a way that aims to illuminate the area behind the ceiling beams.
Essential Safety Measures
Avoid Using Electricity: If you suspect that water is leaking near an electrical circuit, refrain from using electricity in that area to prevent the risk of electric shock.
Gloves and Mask: Wearing gloves and a mask is highly recommended, particularly when you’re in an environment affected by a mold outbreak. This precaution helps protect you from inhaling mold spores.
Temporarily Contain the Leak
When a problem arises, it’s crucial to contain the leak to prevent further damage to the surrounding area while you seek a solution.
Set Up Buckets and Towels
- Collect Water: Set up buckets beneath the leaking spot to gather the dripping water. This method offers a quick and straightforward solution for managing active leaks, effectively reducing the issue at hand.
- Mop up and Protect: Place towels or rags over the leaking spot to absorb the water escaping from the crack, minimizing the risk of it spreading to other areas.
Seal the Leak
If you find yourself working in the house for an extended period, it’s a good idea to address any leaks by sealing them up.
- Repairing Roof Cement: For minor leaks, simply obtain a tube of roof cement, which is perfect for quick fixes. Apply it sparingly and spread it around the affected area to provide a temporary cover.
- Duct tape: For a fast solution, you can seal the leak with duct tape. While it may not be a lasting fix, it can certainly help to temporarily halt the issue for a small period of time.
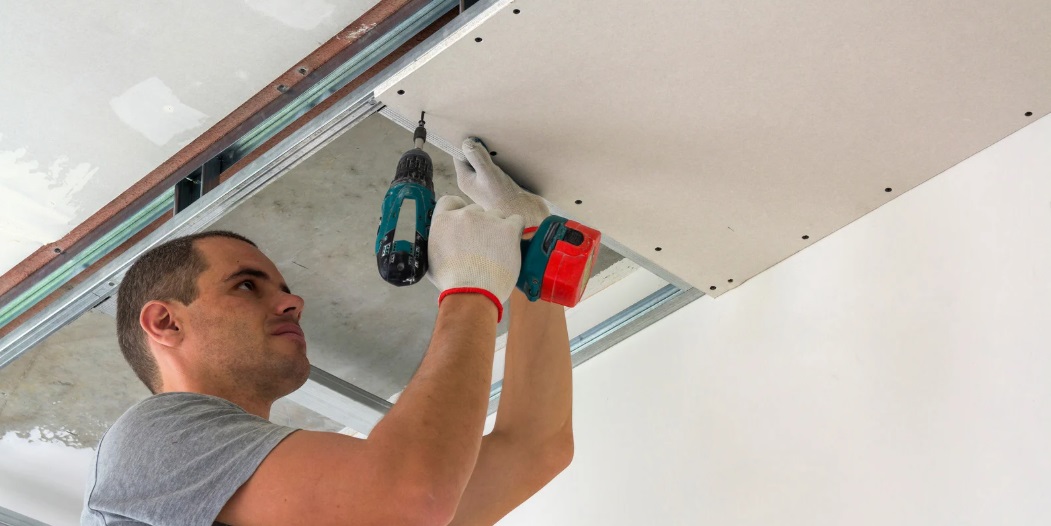
Fix the Interior Damage
Once you’ve addressed the leakage, it’s crucial to repair the interior damage that has occurred, and take steps to prevent any further deterioration.
Remove Moisture
- Install a Portable Air Conditioner and a Dehumidifier: Utilizing fans will help accelerate the drying process in the areas, preventing any mold growth.
- Remove Contaminated Water and Wet Items: It’s essential to take out any affected carpets, ceiling tiles, and other damp materials. Ensure that you dispose of them properly to avoid the spread of mold spores.
Fix the Ceiling and Walls
- Holes and Cracks: Small holes and cracks on walls can be effortlessly concealed with ready-made drywall repair kits. Once you’ve applied the patch, let it dry completely. After it’s dry, sand it down before proceeding to paint it.
- Repair Damaged Areas: If a large area is significantly impacted, you might need to remove the damaged section of the drywall and replace it with a new piece.
- Repaint: After completing the repairs and ensuring the surfaces are dry, it’s time to apply paint to restore the area to its former appearance.
Tackling Mold Issues
Water can lead to mold growth, so it’s crucial to follow the proper steps to remove it.
Remove Mold
- Safeguard Yourself: Wearing a mask and gloves while dealing with mold is a smart move to avoid inhaling spores or coming into direct contact with them.
- Clean to Remove Mildew: To tackle mildew in small areas, a simple solution of water mixed with mild detergent or vinegar can be effective. Gently cleanse the affected area using a soft brush, rinse with water, and then pat it dry.
- Commercial Mold Removers: If you encounter large mold growth, it’s advisable to opt for a commercial mold remover. Make sure you follow the manufacturer’s guidelines when applying the product.
Contact a Professional
- Engage a Roofing Contractor: A roofing professional can assess whether your roof needs repairs or if a new installation is necessary to effectively address the leak.
- Reach Out to Multiple Contractors: To ensure you select the contractor that provides services within your budget, avoid making a decision after just one meeting; instead, engage with at least three different contractors to compare prices and services.
Carry Out Preventive Maintenance
- Regular Inspection: It’s advisable to undergo frequent checks to avoid any issues from worsening.
- Trim Overhanging Branches: Keep tree branches from hanging too low over your roof. This helps prevent potential damage from falling branches and keeps your gutters clear of blockages.
- Gutters and Downspouts: It’s important to make sure your gutters and downspouts are in good condition and effectively directing water away from your home.
